Search This Blog

Saturday, 7 March 2015

Repscrap: DC Motor Control for X-Y working - now to Teacup_Firmware

I am quite happy with my results in getting the Xaxis and Yaxis PID control working Trudy's Quadrature Decoder for the Freescale Kinetis K20 (K20DX256-72MHz) used in the Teensy 3.1.
A big thank you to Miguel Sanchez for his help and inspiration.

Here's a video snip of a quick demo showing the tuned X and Y carriages tracing out a simple 1500x1500 square. The purpose of this demo was to simply allow me to tune the PID parameters for each axis.

I'm currently torn between two separate development  tracks.  The first track is using the Beta6 version of the PID library, cascading Velocity and Position, and defining velocity profiles for each axis.  I've had a fair bit of success in this track, and will publish code and results in a few weeks.  

However, the main track I'm following currently is to get my DC motor control on the Teensy 3.1, working within Teacup_firmware.  For expedience and simplicity, this forces me to emulate a stepper at the moment, passing STEP/DIR commands from Teacup into my motor drive logic.  The reason for splitting the tracks is that the cascaded PID control does not function well in small encoder increments.  Ramp time in the Velocity PID is calculated from position delta... blah blah blah.. 

My Teacup inspiration came from Nikki V's awesome blog series  in when she builds a Teensy 3.1/RAMPS based 3D printer controller over the course of about a month.  I highly suggest you go read through it.

Anyway.... I have had some difficulty (my own lack of awareness) in getting Teacup compiled properly on Ubuntu 14.10 for the Teensy.   Yesterday, I opened issue #122 and was answered within hours!

I'm currently using the newest teensy3 folder from Paul Stoffregen's git repo https://github.com/PaulStoffregen/cores

Dave "drf5n" answered my logged issue, and set me straight.  (It also looks like he's working on Marlin... I should ask him about that..)

I backed up and then removed the version of Teacup_firmware I was currently working from, then issued:

git clone https://github.com/Traumflug/Teacup_Firmware.git && cd Teacup_Firmware
 
After downloading and changing to the directory, I checked out the teensy3 branch:

git co teensy3
 
Then, again carefully following instructions, updated the correct files in the folder to reflect the Teensy hardware.  The makefile also needs to be modified to point to your ARM toolchain and link to the above mentioned Teensy Core library.

$ cp config.teensy3.h config.h
$ cp ThermistorTable.single.h ThermistorTable.h
$ cp Makefile-teensy3 Makefile
$ make
 
Aaaaaaand..... Success!   Compiled! 


Tonight's plan is to modify the config.teensy3.h file to properly reflect the Teensy pinouts for the hardware configuration I have built. 


References:

https://community.freescale.com/thread/320695
http://reprap.org/wiki/Teacup_Firmware
https://github.com/Traumflug/Teacup_Firmware
https://github.com/Traumflug/Teacup_Firmware/issues/122

http://www.idt.mdh.se/kurser/ct3340/ht09/ADMINISTRATION/IRCSE09-submissions/ircse09_submission_22.pdf


Friday, 2 January 2015

Teensy 3.1 based Repstrap control board initial wiring completed - test #1

Sorry that this is taking so long, but... (continued from last week...)
I finally have enough of the control board wired up that I can test the I2C library with Adafruit's Motor Shield V2 as well as the Adafruit LCD Backpack.
I simply took the DCMotorTest2 arduino example from the Motor Shield library, and added the LCD functionality. 

Note: Both the Motor Shield Library, as well as the LiquidCrystal libraries needed to be modified to work with Teensy 3.1.

As the Teensy is not AVR based, the I2C functions a bit different (better, trust me!)


In both instances, references to the "Wire" library had to be replaced with Teensy's  "I2C_T3" library.  ie:

//#include <Wire.h>
#include <i2c_t3.h>    // Replacement I2C library for Teensy 3.1


Also in the Motorshield library as well as it's underlying PWMServoDriver library, I had to force it to use the correct I2C channel.   As the ARM processor in the Teensy has two separate I2C channels, it was defaulting to the second one.


I found this little snippet at the beginning of each library, and modified it to use the first I2C channel.

#include "Adafruit_MotorShield.h"
#include <Adafruit_PWMServoDriver.h>
#ifdef __AVR__                        // Teensy definitely is not AVR, so it defaults
 #define WIRE Wire
#else // Arduino Due               // to wire1 as per the next line.
 // #define WIRE Wire1           // Wire1 in Teensy world is the second I2C
 #define WIRE Wire                // So i simply commented out and replaced.
#endif                                      // Not elegant, but...

And here is the example code to simply ramp the DC motor from 0-255 forward, back down to 0 and then do it again in reverse.  All the while displaying status on the 20x4 LCD panel.


/*
This is a test sketch for the Adafruit assembled Motor Shield for Arduino v2
It won't work with v1.x motor shields! Only for the v2's with built in PWM
control

For use with the Adafruit Motor Shield v2
---->    http://www.adafruit.com/products/1438
*/

//#include <Wire.h>
#include <i2c_t3.h> 
// wire for Teensy 3.1 per https://forum.pjrc.com/threads/21680-New-I2C-library-for-Teensy3
#include <Adafruit_MotorShield.h>
#include "utility/Adafruit_PWMServoDriver.h"

// Create the motor shield object with the default I2C address
Adafruit_MotorShield AFMS = Adafruit_MotorShield();
// Or, create it with a different I2C address (say for stacking)
// Adafruit_MotorShield AFMS = Adafruit_MotorShield(0x61);

// Select which 'port' M1, M2, M3 or M4. In this case, M1
Adafruit_DCMotor *myMotor = AFMS.getMotor(1);
// You can also make another motor on port M2
//Adafruit_DCMotor *myOtherMotor = AFMS.getMotor(2);

/*
Using with the Adafruit LCD Backpack to display information
---->    http://www.adafruit.com/products/292
*/

#include "LiquidCrystal.h"

// Connect LiquidCrystal display via i2c, default address #0x20 (A0-A2 not jumpered)
LiquidCrystal lcd(0);

int spd = 150;          // Motor PWM speed from 0 - 255
int mState = FORWARD;   // State of the motor

void setup() {
  Serial.begin(9600);           // set up Serial library at 9600 bps
  Serial.println("Adafruit Motorshield v2 - DC Motor test!");

  // set up the LCD's number of rows and columns:
  lcd.begin(20, 4);
  lcd.print("Adafruit Motorshield v2");
  lcd.setCursor(0, 1);
  lcd.print("DC Motor test!");

  AFMS.begin();  // create with the default frequency 1.6KHz
  //AFMS.begin(1000);  // OR with a different frequency, say 1KHz
 
  // Set the speed to start, from 0 (off) to 255 (max speed)
  myMotor->setSpeed(spd);
  myMotor->run(mState);
  mState = RELEASE;
  // turn on motor
  myMotor->run(mState);
}

void loop() {
 
  Serial.print("tick");
  lcd.setCursor(0, 3);
  lcd.print("tick");

  mState = FORWARD;
  myMotor->run(mState);
  lcd.setCursor(9, 2);
  lcd.print(" Dir = FWD ");         // Display direction on LCD
 
  for (spd=0; spd<255; spd++) {
    myMotor->setSpeed(spd); 
    lcd.setCursor(0, 2);
    lcd.print("PWM = "); lcd.print(spd); lcd.print(" ");
  }
  for (spd=255; spd!=0; spd--) {
    myMotor->setSpeed(spd); 
    lcd.setCursor(0, 2);
    lcd.print("PWM = "); lcd.print(spd); lcd.print(" ");
  }
 
  Serial.print("tock");
  lcd.setCursor(0, 3);
  lcd.print("tock");

  mState = BACKWARD;
  myMotor->run(mState);
  lcd.setCursor(9, 2);
  lcd.print(" Dir = REV ");         // Display direction on LCD

  for (spd=0; spd<255; spd++) {
    myMotor->setSpeed(spd); 
    lcd.setCursor(0, 2);
    lcd.print("PWM = "); lcd.print(spd); lcd.print(" ");
  }
  for (spd=255; spd!=0; spd--) {
    myMotor->setSpeed(spd); 
    lcd.setCursor(0, 2);
    lcd.print("PWM = "); lcd.print(spd); lcd.print(" ");
  }
 

  Serial.print("tech");
  lcd.setCursor(0, 3);
  lcd.print("tech");
 
  myMotor->run(RELEASE);
  delay(1000);
}

Again, trivial, but it validated that my wiring is correct this far, and that the I2C libraries are functional.

Over the weekend, I'll get the Quadrature Decoders and PID control running, and post another update then.


Monday, 29 December 2014

Prototype Printer Controller Cont'd - Teensy 3.1 w/DC motor/encoders


Here's some more shots of the controller prototype..

I've added a DC/DC converter for clean 5v power to the electronics (5amp).  I've also added a separate 5v linear regulator for the Extruder stepper circuitry.
To get access to the extra pins on the bottom of the teensy, I used a dual row header, and bent the inside pins at a 90 degree angle, trimmed, and soldered.
The shot on the right shows the Real Time Clock crystal soldered into place.

And of course I use my 
legacy 3D extruder 
religiously to lay down layers of plastic "wire holders". 


This is where I wish I had kept all of my old wire wrap tools... Who knew I'd pick up electronics again after almost a 20 year hiatus.

Anyway, power and ground... check. 

Now to the rest of the wires..
 

Sunday, 28 December 2014

Prototype Board: DC motor/Encoder - Teensy 3.1 based 3D printer controller

This will be a short post today.  

I had mentioned putting up pictures as I go along, so I took this to show the first prototype of the controller board.

Here is the layout of my Teensy 3.1 based 3D printer controller.


As of this shot, I have not yet wired it.  Nor have I installed the analog components (power supply, heater drivers, pullup resistors, filter capacitors, etc...).  It is also missing the connector for the extruder stepper motor. 

As I described in my previous post, my motor control design is based on Adafruit's Motor Shield V2.3.  For my prototype... well... I'm using their shield, pilfered from one of my older robots. This fantastic design employs an NXP PCA9865 16 channel 12 bit PWM controller, intended to drive LEDs, but instead to  driving a pair of dual Mosfet H bridge TB6612FNG motor drivers.

The Library for this Shield works with the Teensy 3.1 just fine. (It is just I2C after all).

Ok... I'm off to wire this up... wish me luck.


Thursday, 18 December 2014

Teensy 3.1 Repstrap printer with DC motor control and Flex Timer Quadrature Encoders


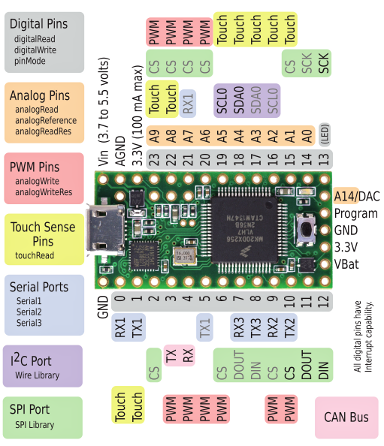
As I re-engage my 3D Repscrap printer project,  I have decided to replace the two 8bit AVR based  Arduino pro minis running at 16Mhz with a single  Teensy 3.132bit ARM core M0 based board running at 96Mhz.   The Teensy is significantly faster, more powerful, and still only $20USD.


I was considerably influenced to change my direction based on this incredibly detailed Blog over at Freescale Nikki  Verriddagari, a Freescale developer, managed to replace the typical Arduino Mega2560 seen in most Reprap style printers with the Teensy 3.1 inside of 3-4 weeks, as a side project.

Both the Teensy and Reprap communities rallied to assist Nikki through a few difficult spots, and huge kudos to the developer of the Teensy 3.1, Paul Stoffregen, for working on the Teacup code with Nikki and getting it debugged and working!


The Freescale MK20DX256VLH7 processor used on the Teensy has two hardware based Quadrature Decoder modules built in. There is a good appnote on how to use them at Freescale. 
"The FlexTimer is a complex, general-purpose timer module that also possesses special features dedicated to a motor control application"

While perusing the Teensy 3.1 developer's site, I came across a forum article where Trudy Benjamin had created a library to use these FTM to read two quadrature encoders.   This looked like as good as anything for a starting point.


I'm using her QuadDecode library for the X and Y axis, and have decided to manage both Z-Axis encoders through hardware interrupts. My thoughts being that the Z-Axis travel is both minimal and predictable. I believe (I've been wrong before!) that Z-Axis movement is conducted typically after a horizontal layer of X/Y is completed.  However!!!  This does not preclude error correction in the Z-Axis PIDs. If something were to bump the extruder or a collision occurred that caused the Z-Axis to change, the PID would try to correct, and the interrupts must be responsive enough to handle this. Running at 96Mhz, I'm confident enough to give this a good shot.

My Design Concept:

I'm basing my requirements loosely on the RAMPS/Mega design, but for DC motors and quadrature encoders.

There will be four DC motors:  One each for the X and Y axis, and two for the Z axis. All will have inexpensive DC brushed motors.  The X and Y axis will have linear optical encoders, while the Z axis will have rotary optical encoders. (This is a mechanical decision for MY implementation, the electronics and firmware should not care).  All motor/encoder pairs will have endstops at each end of their travel.

To manage PWM for four DC motors, as well as PWM for the Extruder heater, Bed heater, and fans, I am choosing to borrow a design from Adafruit's Motor Shield V2.3.  In this shield, they employ a PCA9865 I2C 12 bit PWM controller, driving a pair of dual Mosfet H bridge TB6612FNG motor drivers.


A standard Pololu stepper motor driver board will be used to manage the extruder.

Primary communications will be via the Teensy's USB Serial interface, however I am including a uSD card reader for future plans to read G-Code directly from uSD card.


Starting with the example pinout used in the QuadDecode library,   I have drafted up a connectivity chart and initial schematic that I will be wiring up over the next few days.


Teensy 3.1 Based 3D printer with DC motor/Quad Encoders

Next blog will include photos of the build.


Please feel free to provide constructive criticism as I journey down this path.


References:
PJRC Forum: Hardware Quadrature Code for Teensy 3.x  
PJRC: Teensy 3.1 Encoder Library
Freescale: Configuring the FlexTimer for Position and Speed Measurement with an Encoder
Freescale: PMSM Vector Control with Quadrature Encoder on Kinetis
Kinetis: K20 Sub-Family Reference Manual 
Data sheet: Supports: MK20DX64VLH7, MK20DX128VLH7, MK20DX256VLH7 
Teensy 3.1: Pulse Width Modulation 
Loglow: Interval Timer Library for Teensy 
PJRC: New I2C library for Teensy3  
PJRC: Connecting headers to those pins on the bottom of the Teensy 3.1 


Thursday, 4 December 2014

Should I port SLAM to the Raspberry Pi's unused GPU on my Autonomous Rover?


Right now, I use Arduinos for motor control (PID control for encoders and dc motor) as well as aggregating sensor data and feeding the Raspberry Pi on my Autonomous Rover.

The Pi runs a live stream webcam for the rover, manages the webpage control console, and maps the environment for dead reckoning navigation.  This is a lot of work for one little CPU.

I've recently seen a few articles on using the dormant GPU on the Pi. and though that Simultaneous Localization and Mapping (SLAM) would be perfectly suited for the GPU's capabilities. Real world mapping and localization should be practically identical to Video Game based algorithms... It's been almost a year since Broadcom opened up the specs for this chip.

I would also use the GPU for calculating shortest path via A* routines. 

So... has anyone looked into this? 
 (And yes... I "Googled" it first...)


References:

Andrew Holme: Accelerating Fourier transforms using the GPU
Pete Warden: How to optimize Raspberry Pi code using its GPU
GPGPU hacking on the Pi
Hacking The GPU For Fun And Profit (Pt. 1) 
Broadcom released the specs for the VideoCore IV GPU
SLAM: Remotely-Processed Visual SLAM Using Open-Source Software 


Thursday, 21 August 2014

Running Kinetis Design Studio (32bit Eclipse) on 64bit Ubuntu


YAY!!!!  I got it working!  

Back in the end of May, I enrolled in the beta for Kinetis Design Studio installer for Linux to allow me to develop on my Teensy 3.1 bare-metal,
only to find that it would not run on my Ubuntu 14.04 64bit.  I'm running Oracle Java 7


Kinetis Design Studio installed properly from DEB, but when I launched it, it immediately complained that it could not load the SWT library for Eclipse.  It turns out that they built the Debian (Ubuntu) base on 32bit Eclipse.  

After some futzing around, I opened a case with Freescale Support: (putting the details here for search engine assistance)
SR Number: 1-2152355207Date Opened: 07/28/2014 05:28:35 PHX timeSubject: kinetis-design-studio will not load in Ubuntu 14.04Description: Fresh install of Ubuntu 14.04uname -aLinux ballmik-Satellite-L305 3.13.0-32-generic #57-Ubuntu SMP Tue Jul 15 03:51:08 UTC 2014 x86_64 x86_64 x86_64 GNU/Linux

Running Oracle Java java version "1.7.0_65"Java(TM) SE Runtime Environment (build 1.7.0_65-b17)Java HotSpot(TM) 64-Bit Server VM (build 24.65-b04, mixed mode)

Eclipse appears to be built for 32bit platform. is the a 64bit version ?attaching eclipse log.
Thank you.
!ENTRY org.eclipse.osgi 4 0 2014-07-28 08:06:23.472!MESSAGE Application error!STACK 1java.lang.UnsatisfiedLinkError: Could not load SWT library. Reasons: /home/ballmik/.eclipse/org.eclipse.platform_4.3.2_870091379_linux_gtk_x86/configuration/org.eclipse.osgi/bundles/430/1/.cp/libswt-pi-gtk-4335.so: libgtk-x11-2.0.so.0: cannot open shared object file: No such file or directoryno swt-pi-gtk in java.library.path/home/ballmik/.swt/lib/linux/x86/libswt-pi-gtk-4335.so: libgtk-x11-2.0.so.0: cannot open shared object file: No such file or directoryCan't load library: /home/ballmik/.swt/lib/linux/x86/libswt-pi-gtk.so


Their quick response was that the DEB was built on/for Ubuntu 12.04LTS 32bit.... 

Not helpful...  So...  life got in the way, and I finally returned to this last night.  With fresh eyes, I simply searched G00gle for "running 32 bit eclipse on 64 bit Ubuntu 14.04"  and came up with a bunch of different solutions. 


The issue is that in 64bit Ubuntu base install, the 32bit libraries are not installed.  period.

Prior to Ubuntu 14.04, you used to be able to "sudu apt-get install ia32-libs", but they removed this ability recently because dpkg now has multi-arch enabled by default. MEANING, that if you actually knew what libraries were failing, you could reinstall them with a :i386 at the end of the package name.  Seemed like a lot of work to find the specific libraries... 


Here's what worked for me.
(from Stackoverflow: How to install ia32-libs in ubuntu 14.04 LTS)

sudo -i
cd /etc/apt/sources.list.d
echo "deb http://old-releases.ubuntu.com/ubuntu/ raring main restricted universe multiverse" >ia32-libs-raring.list
apt-get update
apt-get install ia32-libs


Reboot, and voila! Kinetis Design Studio is now working!


Now, on to figuring out how to code for the Teensy 3.1...


Resources:

Freescale: Kinetis Design Studio
Ubuntu.com: Multiarch
Stackoverflow: How to install ia32-libs in ubuntu 14.04 LTS
Teensy 3.1 Bare-Metal